Sunday, March 31, 2013

Happy Easter ~ He is Risen!

Wishing all of you a very Blessed Easter!

Matthew 28:6, Easter

I've been wanting to make a chalkboard printable forever
 and thought this was the perfect occasion.

This one has a white boarder around it - 


Easter blessings to you and your family!


Photobucket


We're on the Fence! Won't you take a minute and vote for us?

Friday, March 29, 2013

Instagram Friday

Are you on Instagram? We recently added an Instagram feed thanks to a great tutorial by Erin @ Taking Time To Create.  Since then, I've been adding pictures on an almost daily basis.

Here are few recent Instagram creations that I collaged together via PicMonkey-


I love how you can instantly make your photos look all artsy and cool with all the filters they have. It's a great way to chronicle your everyday life in pictures. You can also share your Instagram pictures on Facebook.

Here are a couple of great tutorials on using Instagram -

Queen Be and Me: 10 Ways to be Awesome At Instagram

Help Me Rhonda: Instagram How To, Basics Part 1

Her New Leaf: Instagram Tips and Tricks

I usually take pictures with my Iphone camera app and then open them up in Instagram and add filters to them. That seems to work for me, but I'm not an expert by any means.

Are you in Instagram? We would love to follow you! Leave your user name in the comments and we will be sure to follow you.

You can find us at jlstyle!  Hope you are having a great Friday Evening!

Photobucket


We're on the Fence! Won't you take a minute and vote for us?

Saturday, March 23, 2013

Gel Stained Oak Bookshelf

We finally finished Leigh's Bookshelf and we LOVE how it turned out!  Many thanks to Monica Wants It and One Good Thing by Jillee (and Pinterest) for introducing us to General Finishes Gel Stain.

Ta Da!

General Finishes Stain, Gel Stain, Before and After, Bookshelf

I have to say that this stain is amazingly easy to work with and completely transforms your furniture. I applied 3 coats with foam brushes and 1 coat of the poly, also with a foam brush. The directions on both blogs called for multiple coats of poly, but since this won't be in a wet or high use area, we thought  (ok, we hope!) that 1 coat would be enough. Only time will tell.

We ordered both the stain and poly on Amazon -


I'm staining our bedroom furniture with this same stain and hope to have it completed next weekend. I'm trying to take my time and let it dry completely, but I'm really tired of all my clothes being in grocery sacks on the bedroom floor!!!


Wishing everyone a wonderful weekend with lots of fun projects in your future!

Photobucket


We're on the Fence! Won't you take a minute and vote for us?

Sunday, March 17, 2013

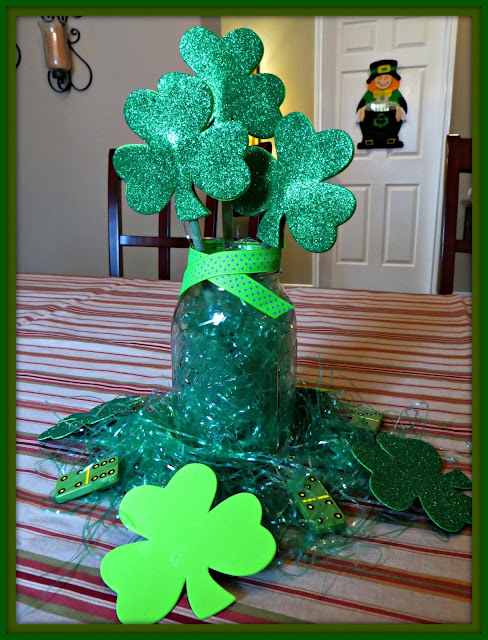
Simple Shamrock Centerpiece

Happy St. Patrick's Day!  Today is my son Ty's birthday and we are having the family over for burgers.  I needed something for the dining room table and had a pack of foam shamrocks from Dollar Tree, so I threw this together for the table.

Used the glue gun to glue a leftover flower stems sandwiched between a glittery shamrock and a plain one.  Then filled the jar with Easter grass, added a bit of ribbon and a few green shamrocks we had.  Would have looked better with gold coins, but this was a last minute idea.  Only took 5 minutes to throw together!

Don't look at the wrinkles in my tablecloth!! Oh well, at least it is clean!!

St. Patrick's Day, Shamrock, March 17

St. Patrick's Day, Shamrock, March 17

Hope you are having a lovely St. Patrick's Day!

Photobucket


We're on the Fence! Won't you take a minute and vote for us?

How to Enable Pinning from Bloglovin'

Ok, I'm sure you've all seen the news - Google Reader is Shutting Down on July 1st.  The blogging world has been in an uproar the last couple of days over it.

Frankly, I thought it was an ugly internet rumor....but it's true! Most of the blogs I follow have switched over to Bloglovin .  When we first started blogging I set up a Bloglovin account, but found that I couldn't pin to Pinterest.  So, although I did like the layout of Bloglovin, I gave up and went back to Reader.

Tonight, I found out how to enable Pinning from Bloglovin and thought I would share.  It's just a matter of changing your settings as follows -


1.  Select Account                 2.  Select Settings


3.  Scroll to the bottom and select - I don't want the frame.


I hope this saves you some grief and irritation! With this change, I'm Lovin' Bloglovin - How about you?

Hope you have a wonderful St. Patrick's Day!

Photobucket


We're on the Fence! Won't you take a minute and vote for us?

Thursday, March 14, 2013

Gus the Bunny Goat

Leigh and I have a lot of fun at work dressing up our company mascot - Gus the Goat! It makes us laugh, although Gus doesn't really seem to enjoy it - poor thing! But at least he gets a granola bar out of it!


Don't know about you, but I'm so glad tomorrow is FRIDAY!!! Hope you have a Funtastic Weekend!

Photobucket


We're on the Fence! Won't you take a minute and vote for us?

Wednesday, March 13, 2013

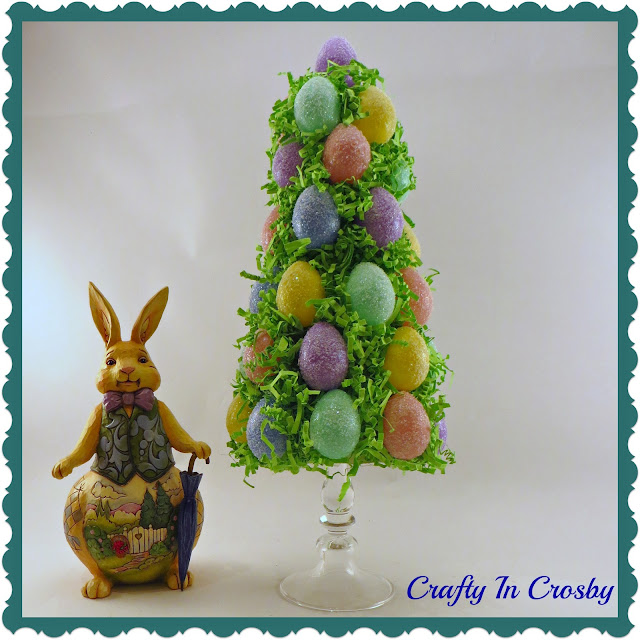
Easter Egg Tree Revisited

We started blogging last year on the last day of February and this was one of our very first tutorials.  The pictures that I posted were horrible, so I thought I would take some new ones and try to re-touch the picts from the tutorial. By now, you all know, that I'm not a great photographer!!

So here is last year's Easter Egg Tree Tutorial with somewhat better (?) Photos -

Easter, Crafts, Easter Eggs


Since Easter is right around the corner, I was determined to make an Easter Egg Tree that was inspired by a post on Pinterest from Sweet Floweret  Unfortunately, I couldn't find any affordable glittered eggs, so I made my own.  I also, couldn't bring myself to spend $4.99 on a styrofoam cone, so I made the cone out of poster board from the dollar store.  I like to think of myself as a Thrifty Crafter - ok I'm CHEAP!
Easter, Crafts, Easter Eggs


Since I made it out of a cone I was able to place it on a glass candlestick to raise it up.  I think it adds a little bit of elegance to it and also gives it more of a presence.

You will need - Mod Podge, Glitter - I used Sullyn from Hobby Lobby and some very fine purple that I've had for ages, 2 bags of small eggs (48), 1 bag of green paper grass, poster board, and a glass candlestick.

This is the messy part - Have Fun!  Paint each egg with Mod Podge, then cover in glitter.  I poured small amounts of both glitters onto a paper plate and then sprinkled them on to the Mod Podge covered egg that I placed in a small bowl.  Shaking the bowl to make the egg turn helps evenly cover the egg.  I let mine dry overnight, but they would probably dry in an hour or so.


Then it is time to make the cone.  Take a length of ribbon or string and tie one end on to a pencil.  Measure 12" out and tie a knot.


Hold the knot on the corner of the paper and make a mark from one side of the poster board to the other.


Then measure 2 inches on the ribbon from the pencil and a make another line in the corner of the poster board.


Next cut out the poster board.


Roll the poster board into a cone and secure it using tape.  You will want to end up with an opening instead of a point.  That will allow you to position the last egg on the top of the cone.  The cone will be a little off, but you can even it out with scissors.


Here it is with the little uneven bit cut off.

If you are going to place the cone on a candlestick you should trace the bottom of the cone now so that you can make an insert that will allow the cone to be secured to the candlestick. Otherwise, the cone will slide down and cover the candlestick.  

I traced bottom edge of the cone onto a piece of posterboard and cut out the circle.  Trace a smaller circle about 1/3 of an inch inside the outer edge.  Then cut tabs all the way around the circle.  I used my glue runner on the tabs, then bent them up and placed this into the bottom of the cone.  It should fit about an inch up into the cone and may take a few adjustments to get it right.  Once I had it in and level I used the glue gun on a few of the tabs to secure it permanently.


If I had this to do over I would probably cover the cone with green paper and then add the Easter Grass, but you know what they say about hindsight!!!  I used spray adhesive and then lightly covered the cone with grass.  You will add more grass after gluing on the eggs to fill in the holes so don't worry about the white showing through.  Of course, if you cover the cone with green paper that would solve that problem!


Using a glue gun and generous amounts of glue, start adhering the eggs.


After they are all glued on you will need to fill in the gaps with more grass.  I just bunched up several strands, hit it with the glue gun and stuffed it in the holes.

I used a generous amount of hot glue to secure the candlestick inside the cone after all the eggs were glued on.
Easter, Crafts, Easter Eggs


Hopefully, these pictures were a little better than last year's! I still love the tree and it held up really well - even stored in the hot attic.

I'm having a hard time with my decorating this year since Easter and St. Patrick's day are so close together.  I have my St. Patrick's Day Wreath from last year on the outside of the front door and the Easter wreath on the back of it!

How about you? Are you putting out decorations for both holidays? I'm really conflicted about this one! LOL! Oh, the worries of a chronic crafter!

Photobucket


We're on the Fence! Won't you take a minute and vote for us?

Sunday, March 10, 2013

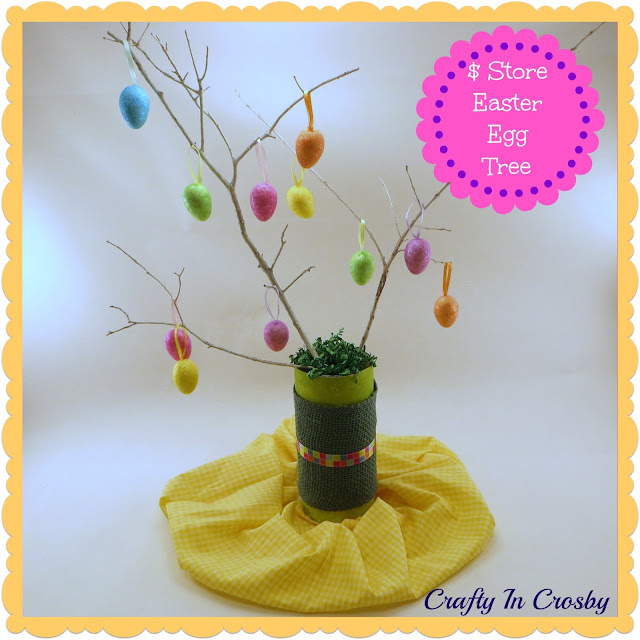
Dollar Store Easter Egg Tree

I finally got my Easter decorations up today! The mantel needed something new so I threw together an Easter Egg tree with a $ Store Vase and a package of $ Store Glittery Eggs.

Dollar Store, Easter Egg


Took all of about 10 minutes to throw together since I already had the tree branches from our Valentine's mantel.


Cut your scrapbook paper to size and affix with adhesive, wrap a strip of burlap ribbon and printed ribbon around the vase and glue down.  Spray paint your branches white, stick them in the vase and hang the eggs.  That's it!

I placed mine on top of a candlestick to give it some height on the mantel - didn't glue it, just sat it on top.


I just love the bright colors of the eggs and the paper.  So bright and cheerful! (Not to mention CHEAP!)

Got the plant shelf decorated with my new bunny from Kirklands - isn't he cute?

Hope everyone had a fantastic weekend!!!


Photobucket


We're on the Fence! Won't you take a minute and vote for us?

Friday, March 8, 2013

And the Winner is.......

Congratulations to Breanna Friedrich! She is the winner of our $25 Hobby Lobby Gift Card!

Thanks to all of our wonderful followers for entering the contest!


Photobucket


We're on the Fence! Won't you take a minute and vote for us?


Related Posts Plugin for WordPress, Blogger...