Tuesday, September 30, 2014

Take Dollar Tree Skulls from Cheapy to Creepy in Less than 5 Minutes

Any of you that have seen any of our other posts know that we love Halloween and Dollar Tree at Crafty in Crosby.  Hopefully, you haven't gotten tired of all our Halloween/DT posts yet 'cause here's another quick an easy way to take those cheap looking plastic skulls from cheapy to creepy in about 5 minutes!
skeleton, Halloween Decorations, Easy Halloween Decorations, Quick and Easy Halloween

 I'm sure you've seen these skulls at Dollar Tree - they look pretty fake all by themselves - 


But, string 3 of them on twine and hang them up and they are instantly turned into something creepy and cool - reminds me of shrunken heads.  In fact, I think that I'll add some Spanish moss to them for a little more creep factor!

All we did was cut a small hole in the top and enlarge the hole on the bottom, use a piece of wire to pull the twine through and tie three of them together! Bam! Quick and Cheap!


skeleton, Halloween Decorations, Easy Halloween Decorations, Quick and Easy Halloween


skeleton, Halloween Decorations, Easy Halloween Decorations, Quick and Easy Halloween

skeleton, Halloween Decorations, Easy Halloween Decorations, Quick and Easy Halloween


Stop back by in a few days to see one more way to use a 
DT skull for another creepy Halloween decoration!

Woot Woot - Tomorrow is Hump Day! Hope your week is flying by!


Photobucket

We've Linked up to these Fabulous Parties - Totally Terrific TuesdayLive Laugh RoweJuggling Act Mama


We're on the Fence! Won't you take a minute and vote for us?

Sunday, September 28, 2014

Easy Skeleton Hand Candle DIY

There is something about Halloween that calls for creepy candles and this year that seems to be our focus.  This creepy but classy candle started with a glow in the dark skeleton hand from Dollar Tree. The hand comes with a stake to use as yard decoration.  I tried it outside, but it just didn't glow enough for me, but I with a bit of paint, it makes the perfect candle decoration.

Halloween candle, Halloween DIY, dollar store Halloween, creepy candle

Didn't take many pictures of the process, but it is pretty easy.  Just cut the bottom part of the hand off - I used our handy hot knife, then paint the hand white and highlight with watered down black paint.

Halloween candle, Halloween DIY, dollar store Halloween, creepy candle.

Paint the hand white and let it dry thoroughly.  This one had to be repainted because I didn't wait long enough before wiping on the black paint - Ugh!  I would suggest waiting until the next day to for the black highlights, then just water down the black paint and wipe it on with a napkin.  I added a bit more in the creases for highlights and wiped it down a little more.  Hot glue the hand to the candle, add a spider and a bit of moss around the bottom and  there you have it - 
a creepy, but classy Halloween candle.

Halloween candle, Halloween DIY, dollar store Halloween, creepy candle

Halloween candle, Halloween DIY, dollar store Halloween, creepy candle


Halloween candle, Halloween DIY, dollar store Halloween, creepy candle


You would be hard pressed to find an area of our home that we have decorated for Halloween without some revamped Dollar Tree decorations in it. What can I say, we are cheap!!!

We will be sharing more Dollar Tree Decorations over the next week. Only 32 more days until Halloween so stop back by for more frugal decorating ideas!


Photobucket


Tuesday, September 23, 2014

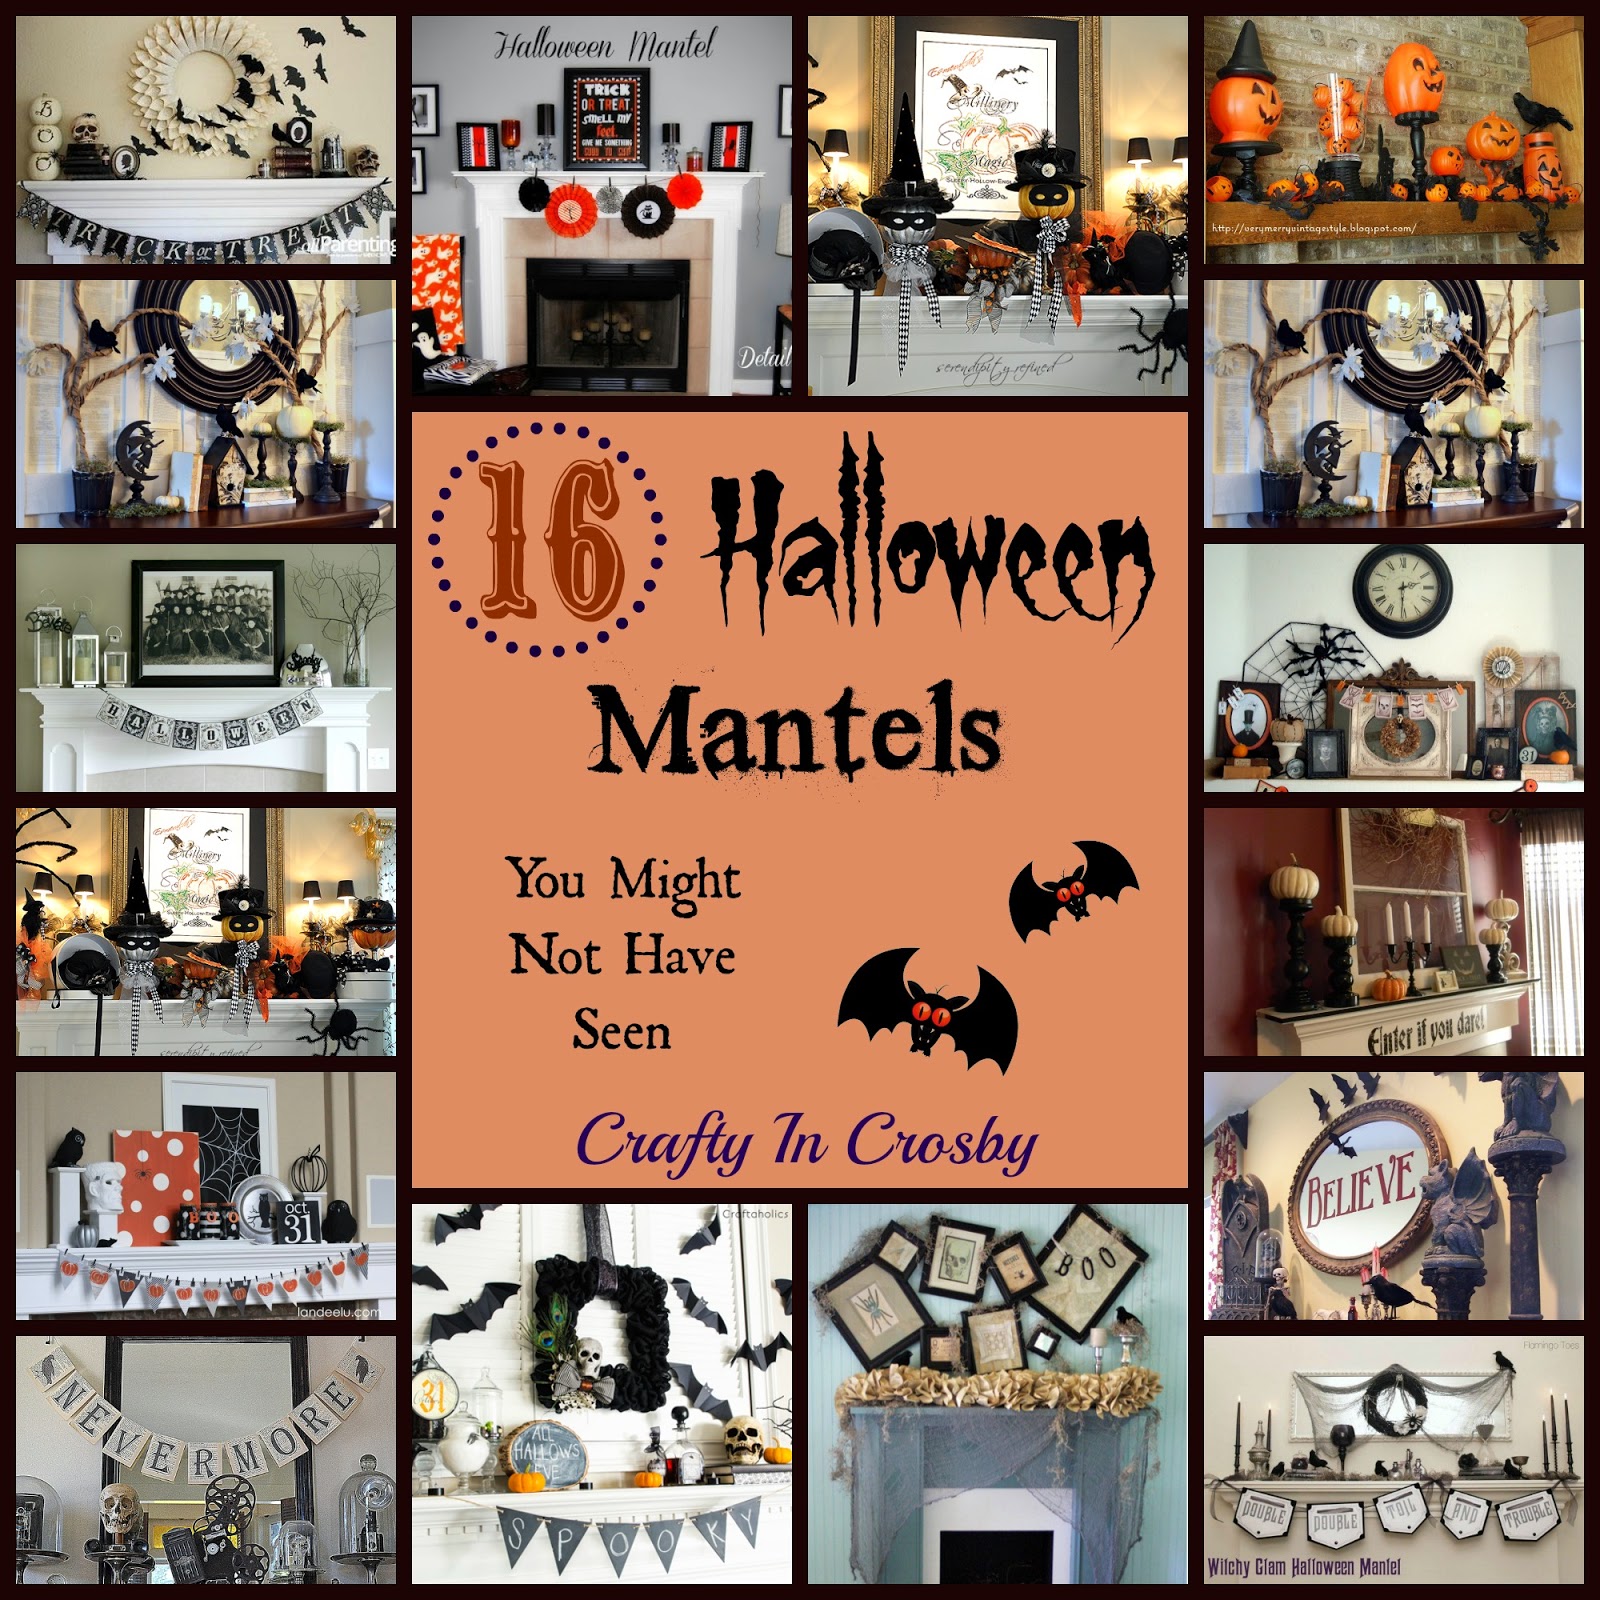
16 Halloween Mantels You Might Not Have Seen

My name is Jeanette and I have a problem...... Ok, 2 problems - I'm addicted to Pinterest and Halloween! I guess in the scheme of things, there are certainly worse problems to have, maybe not according to my hubby, but I'm sure there have to be!

Since we started blogging in 2012, I've also become obsessed with decorating our mantel and thought I would share 16 Halloween Mantels that I really adore.

spooky mantel, easy Halloween mantels, Halloween mantel roundup


The source for each mantel is listed above each photo and each photo also links to the source.

I love the masked pumpkins by Serendipity Refined. Such an elegant mantel with the black and silver touches.


Check out all of the vintage pumpkins used by Very Merry Vintage Style These are the pumpkins of my childhood and bring back lots of fond memories.


Paper bats and a book page wreath were used by All Parenting to decorate their spooky mantel.


The Detail-Oriented Diva used classic orange and black paper fans on her cute mantel.


Love, love, love the white pumpkins and the Enter if you Dare vinyl used by Organize Your Stuff Now.


A burlap wreath, chalkboard banner and paper bats completes Craftaholics Anonymous' look.


I saw this Frankenstein head at Michaels just last month, and then I saw how Landeelu used it. Love that she only highlighted it with silver and left the rest of it white. And those square columns are just fabulous!


More paper bats and gruesome gargoyles on Batchelors Way's mantel


Home Stories A to Z's combination of rolled paper trees, white and black accents and book page wall just makes me drool! And who would have thought of white bats? They just pop off her wood mantel.


A Witchy class photo and black and white banner by Just A Girl have an awesome vintage vibe.


Love this Nevermore book page banner by Rook No. 17 and we have the perfect spot for one over our Nevermore display.


Here's another classic banner by Starshine Chic.


Flamingo Toes decorated her mantel with black tapers, ravens and a Shakespearian phrase for her black and white display.


Crooked frames and a book page garland complete Shabby Creek Cottage's mantel.  Love how the black frames pop off her blue wall color.


Another beautiful black and white mantel by The Elephant of Surprise rounds out our selection.


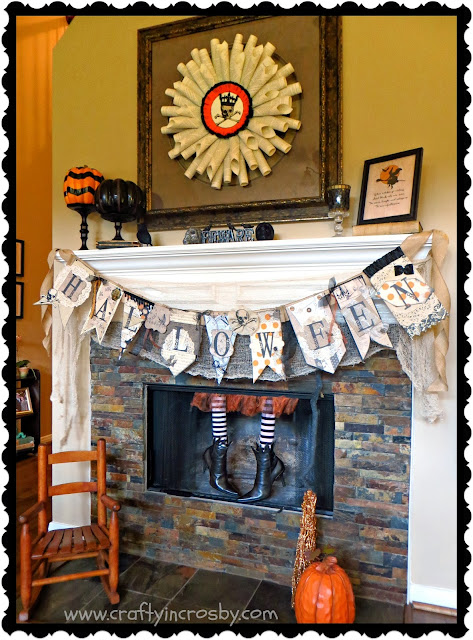
And last but not least, here is our 2013 mantelscape - 


I hope that one of these spooktacular images will get your creative juices flowing and inspire you to decorate your mantel for our favorite holiday. 

Have you decorated your mantel yet? Leave us a link, we would love to see your creation! Just 37 more days until Halloween!! Yippee!

Photobucket


We're on the Fence! Won't you take a minute and vote for us?

Tuesday, September 16, 2014

Super Easy Paper Towel Roll Halloween Candles

If you saw our Halloween 2014 Pinterest Picks a few weeks back, you saw the Halloween Candles by Thrifty Crafty Girl. Our candles were inspired by her's and House of Dewberry's.

These are probably some of the most frugal and creepy Halloween decorations we have made.

Halloween Candles, Spooky Candles, Tea Light Halloween Candles, Dollar Tree

Here's the list of supplies you will need - 

1. Paper Towel Cardboard Tubes
2. Masking tape
3. Battery operated tea lights (Dollar Tree has black ones in 2 packs for Halloween)
4. Glue gun and plenty of glue sticks
5. Black paint - I used spray paint but craft paint would work too.
6. Silver paint - I used glitter nail polish because it was easy!
7. Glass pebble or small pebbles to weigh down the candle
8. Exacto knife if you are going to cut out a face.

And here's a quick Picture Tutorial to show you how to make them - 

Halloween Candles, Spooky Candles, Tea Light Halloween Candles, Dollar Tree


A couple of tips that I learned along the way - 

1. As soon as the drips on the bottom of the candle are dry to the touch, remove the wax paper.
2. If you have drips on the bottom that aren't in the shape you want (hot glue can leave strings and little points) just cut them off with scissors.
3. If you are going to cut a face into the candle, don't tape the rock in the bottom as you will just sit the candlestick over a tea light.
4. After you cut out the face and paint the candle, slide a small strip of white paper into the candlestick and affix it with tape.  This will help the light from the candle reflect better and give you brighter glowing eyes.
5. If you can't find the black tea lights, just put a piece of masking tape over the tea light flame and spray paint it.

And last but not least - have fun and make lots of candles!

Halloween Candles, Spooky Candles, Tea Light Halloween Candles, Dollar Tree


Halloween Candles, Spooky Candles, Tea Light Halloween Candles, Dollar Tree


Halloween Candles, Spooky Candles, Tea Light Halloween Candles, Dollar Tree

We are going to make as MANY of these as we can for Halloween this year.  They will look awesome in all the nooks and crannies around the house.  And since I promised Mr. Crafty that we wouldn't spend a ton of money decorating for Halloween this year and these basically cost about $2 for a set of 3, we can make lots!

Halloween Candles, Spooky Candles, Tea Light Halloween Candles, Dollar Tree


Only 44 Days until Halloween and 36 until our Annual Halloween Bash! Have to start practicing my wicked witch laugh!!!


Photobucket


We've Linked up to these awesome parties: Fluster MusterCrafts a la modeSix Sisters Stuff


We're on the Fence! Won't you take a minute and vote for us?

Sunday, September 14, 2014

Grandinroad Halloween Wreath Knock Off

Every year my Mother-in-law gives me her Grandinroad Halloween catalog and every year, I drool over the beautiful decorations, especially the wreaths.  Along with all my other obsessions, Halloween and wreaths are my top two! So when I saw their beautiful "Happy Hauntings" wreath, I decided that we just had to have one.  Unfortunately, Grandinroad's is way over our budget, so I set out to see if we could come up with a less expensive version.

Dollar Tree, .99 Store, Halloween DIY, Knock Off Decor, skeleton, skull, feather boa

Here is Grandinroad's wreath - 


There are a few differences - theirs has only a skull, while ours has a torso and theirs has more detailed hands, but all in all, I think it's a pretty good copy.

Dollar Tree, .99 Store, Halloween DIY, Knock Off Decor, skeleton, skull, feather boa


The biggest difference is that our version cost $12 to make and almost all the supplies came from the .99 Store and Dollar Tree! Not bad for $12 bucks!

Here's a list by store - 

.99 Store

1 - Skeleton torso 
2 - feather boas
Dollar Tree

3 - rolls Halloween Ribbon
2 - Halloween glitter stems (1-orange, 1-purple)
2 - Willow wreaths

Hobby Lobby

2 - Fun Foam glitter sheets 

Tools & Misc. Supplies

Glue Gun
Heat Gun
Wire
Small piece of orange ribbon for top hat
black cardstock for top hat
Small piece of black foam core board
Purple paint
Sharpie
Coat hanger

Instructions

1. The base of the wreath started with a wire coat hanger that was opened up and formed into a circle. 

2. Cut one wreath and wire to the coat hanger circle.  The wreath won't be large enough to cover the entire circle, so cut a piece out of the remaining wreath and wire it to the hanger to complete the circle.  The wreath is only a base and will not be seen after you have glued the feather boas to it.

Here's a view of the wreaths before their surgery - 


And here is a view of the back of the wreath, after they have been wired to the hanger - 


I sprayed the coat hanger with black spray paint, but that's just my craft OCD kicking in - it's really not necessary.

3. Hot glue the two boas to the top of the wreath.  One boa will just go around the wreath once, so use both to make it fuller.


4.  Now let's work on the skeleton.  Here's what he looked like before he was posed - notice his straight stiff arms.


To make him look more life like, I used a heat gun to heat up his elbows and bend the arms into a more natural position.  You can see how much more natural he looks here - enjoying a nice tropical drink!


His arms have a small button on them that attaches them to the torso - you can see that here - 


Pull his left arm out of his torso and cut off the button flush with the bone. Then hot glue the bone into the torso like this - you can see the difference between the shoulders in this shot - 

Dollar Tree, .99 Store, Halloween DIY, Knock Off Decor, skeleton, skull, feather boa

I also used the heat gun to tilt his left wrist forward just a bit.

5. Now the skeleton can be wired on to the wreath. Cut small holes in his back on either side of the back bone and run floral wire through, then wire on to the wreath.  Place one set of holes high and the torso and one set low.  You will also want to hot glue the skull on to the neck so that it doesn't wobble.

6. Cut a jagged "board" out of a piece of foam core board (or cardboard), paint purple and write
 Happy Haunting on it with a sharpie. Hot glue a piece of wire on the back and wire the board to the wreath.  I also used a dab of glue to affix the "board" to the skeleton hand.

7. Top Hat - I didn't take any photos when I was making the hat - sorry!!! But here's the basic how to - cut 2 circles of glitter foam for the brim, cut out inner portion so that it will sit on his head - Cut a strip of black card stock to make the main part of the hat - form into a tube and glue - gut tabs into one end (all the way around) - tabs should be about 1/2" - slip tabs under one brim and hot glue tabs to brim - glue other brim upside down so that glitter shows underneath - cut strip of glitter foam to cover cardstock tube - cut glitter circle for the top.  Trim hat with ribbon and a bit of glitter stem

8.  Make loops of ribbon and wire around the torso. Then cut the glitter stems apart and use them to fill in around the torso.

And TA DA!!! You will have a Grandinroad Happy Hauntings Wreath KNOCK OFF!!!

Dollar Tree, .99 Store, Halloween DIY, Knock Off Decor, skeleton, skull, feather boa

Dollar Tree, .99 Store, Halloween DIY, Knock Off Decor, skeleton, skull, feather boa

Dollar Tree, .99 Store, Halloween DIY, Knock Off Decor, skeleton, skull, feather boa
Elegant and Cheap too!!! Maybe not as elegant as Grandinroad's version, but it works for me!

Hope everyone had a great weekend! Leave us a line and tell us what you are working on for Halloween - we would love to see your creations!


Photobucket

We've linked up to these awesome parties: Fluster MusterCrafts a la modeSix Sisters Stuff

We're on the Fence! Won't you take a minute and vote for us?


Related Posts Plugin for WordPress, Blogger...