Thursday, October 31, 2013

Halloween Party 2013 - Photo Booth Fun!

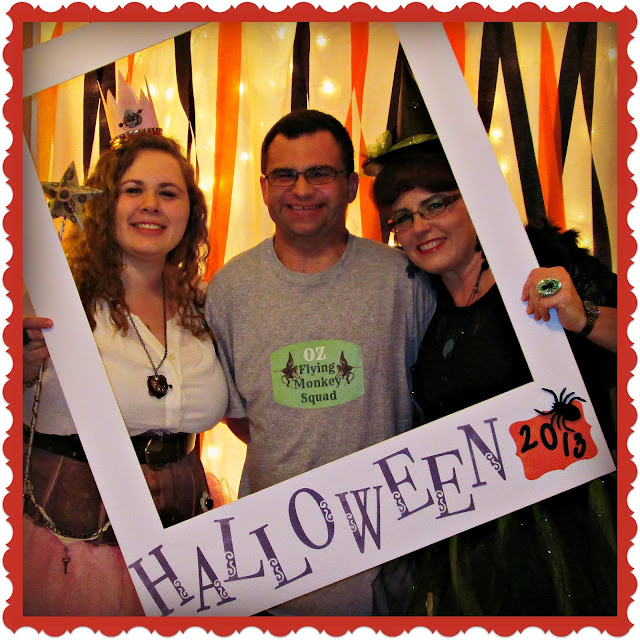
Last Saturday night was our 2nd Annual Halloween Bash! Actually it is our 2nd Annual since the kids have grown up bash since we had them every year for the kids starting when Leigh was in 1st all the way to 8th grade.

Warning: PHOTO OVERLOAD!!! Sorry, but we just had so much fun!

We had such a great time and the photo booth was a hit again this year!


We had prizes for the best costumes too!


Can't wait for next year and we are already thinking about what we will be!

Hope you all had a fantastic Halloween!
Photobucket


We're on the Fence! Won't you take a minute and vote for us?
 

Wednesday, October 23, 2013

DIY Polaroid Photo Booth Prop

Saturday is the big day - Our Halloween Bash 2013! We had such a blast last year and the photo booth was so much fun that we decided to do it all over again.

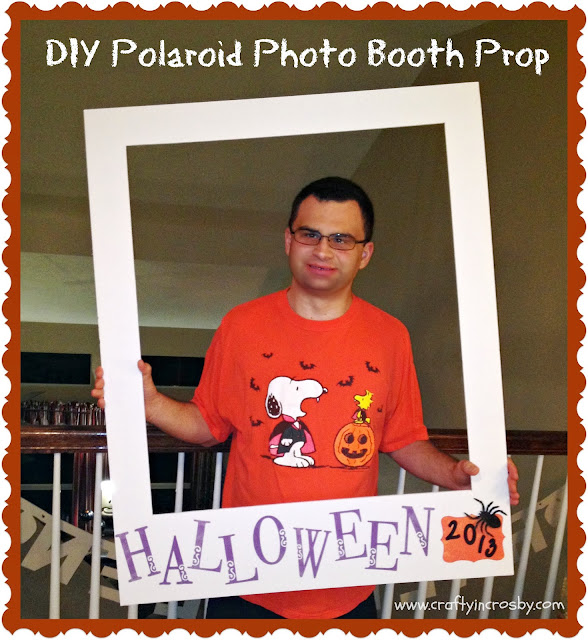
I don't have the booth set up yet, but we made a really quick Polaroid Frame Prop for it tonight.  I made Ty put on his Halloween shirt and try it out for me!  Sorry for the poor photo quality - took them all with my Iphone!  Too tired to run down stairs and find the real camera.

Halloween Photo Booth, Polaroid Frame DIY, foam core board


The frame is made from a 22 x 40 sheet of foam core board ($5.99 from Hobby Lobby).  The sides and top are 3" wide and the bottom is 7". Mark the lines on the back and cut them with a craft knife.  The letters and numbers were cut on my Cricut and the spider is from the Dollar Tree. 

We have the perfect spot upstairs to have the photo booth and Skully the Skeleton is standing on the landing and pointing the way! Picked him up from Dollar Tree and made the chalkboard from a piece of black foam core and chalkboard spray paint.

Dollar Tree, Skeleton, Photo Booth, chalkboard sign, Halloween Decorations, Easy Halloween

We will have lots more photos to share next week along with a Halloween House Tour 2013. Hope to see you soon!


Photobucket


We're on the Fence! Won't you take a minute and vote for us?

Thursday, October 17, 2013

Sally Skeleton - Ready for the Halloween Bash!

If you take a look at our Holiday page, it is pretty obvious that we LOVE HALLOWEEN!!! We are really excited about this year's Halloween Bash and have been decorating like mad for it.

Pinterest has been a great source of ideas for us and Leigh and I both loved Sarah, from Alberry Hill's, Ghoulish Centerpiece. We used it as inspiration for our Sally Skelton Centerpiece - what do you think?

Halloween Decorations, skull, spooky decor, DIY Halloween Decorations

Isn't she cute?  All dressed up with her party hat,
fake eyelashes and vintage necklace!

Halloween Decorations, skull, spooky decor, DIY Halloween Decorations

She was really easy to make and only required a few Dollar Tree supplies, some tiny pumpkins from Michaels, a thrifted candlestick and charger purchased last year after Halloween.

Halloween Decorations, skull, spooky decor, DIY Halloween Decorations

The props - rats, crow and RIP all came from Dollar Tree too!

Halloween Decorations, skull, spooky decor, DIY Halloween Decorations

Sally is going to be an elegant addition to this year's  Halloween Bash! 
Only 8 days to go until the big day!


Photobucket


We're on the Fence! Won't you take a minute and vote for us?

Sunday, October 13, 2013

Walking Dead in our Window

In honor of the season premier of Walking Dead, we added a couple of Zombies to our front windows! They look so cool from the street.

Zombies, Halloween Window Art, Walking Dead, Halloween Yard Art


Zombies, Halloween Window Art, Walking Dead, Halloween Yard Art

These images are courtesy of David Lowe Design.  He has great instructions on his blog along with several other Zombie designs. 

I'm lucky enough to have a projector at work and I used it to project each image on to 2 sheets of white poster board (they were out of black at Wal-Mart!!!). Then I cut out each zombie, taped the pieces together with duct tape, flipped them over and spray painted the front with flat back spray paint. A couple of pieces of scotch tape adhered them to the windows and they were done!
The Walking Dead, Halloween Window Art, Halloween Decorations, Zombies

What do you think - too much? I absolutely love how awesome they look with our orange lights.  Plus, they are just goofy enough to be cute! 

We are just about ready for the Halloween Bash!  Wishing all of you a wonderful week!

Photobucket

We Linked up to: CityFarmhouse


We're on the Fence! Won't you take a minute and vote for us?

Super Saturday Fun Day making Halloween Decorations

What a great day! Leigh and I spent the entire day working on Halloween decorations and getting the house ready for our Halloween bash!

Here are a few of the crafts we made today -

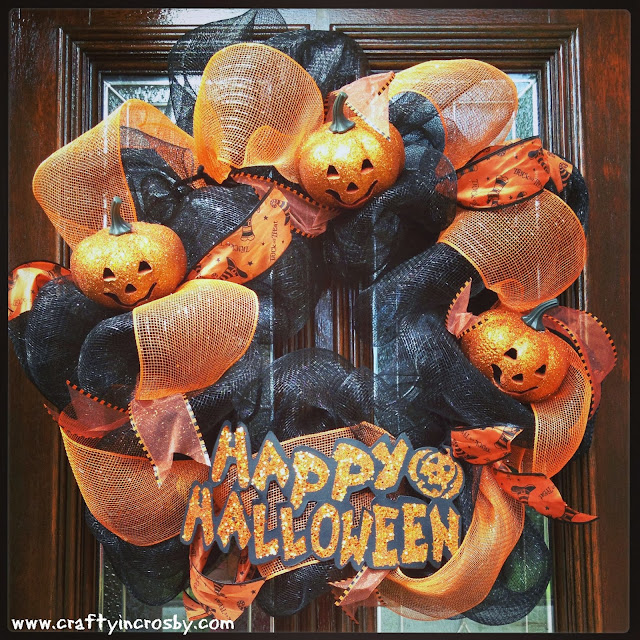
I'm really in love with Deco Mesh (as I'm sure you can tell by looking at our Holiday page!).  The Deco Mesh and wreath form came from Hobby Lobby, and the pumpkins, ribbon and Halloween sign came from Dollar Tree.  The whole thing cost less than $20 and we love it!

Dollar Tree, pumpkins, Happy Halloween, DIY, Crafty In Crosby


How about our Spooky Halloween Candles?  
The candles, spiders and skeleton all came from Dollar Tree.  
With the addition of a little burlap ribbon, they are fantastic!

Dollar Tree, spiders, skeleton, candles, diy, burlap, Crafty In Crosby

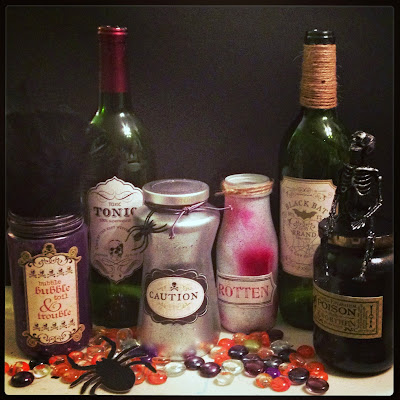
Everyone could use a few Spooky Potion Bottles for their Halloween celebrations? Right? Leigh did a fantastic job on these with cute labels that we purchased at Michaels.  My favorite is the Poison jar on the right with the Dollar Tree skeleton on top!

Halloween Decorations, skeleton, diy

More Dollar Tree spiders hot glued on to a piece of yarn for 
an Easy-Peasy spider garland.

Dollar Tree, Halloween Decorations, DIY, Halloween DIY

There is nothing I enjoy more, than spending the day with my sweet girl in the craft room! Hope you all had a wonderful weekend!

Photobucket


We're on the Fence! Won't you take a minute and vote for us?

Tuesday, October 8, 2013

Make your own Bell Jar or Cloche

Ok, so is it a Bell Jar or is it a Cloche?  I found this explanation at English Creek Gardens -


The French developed the glass cloche, or bell jar, formed of a solid piece of glass shaped like a dome. The purpose was to protect an early garden plant from bleak cold and frost. This would hasten their crops to maturity. The Dutch and English expanded the idea with handlights, lantern style, faceted pyramidal covers made from glass panes and frames of cast iron. 

So it is both! That begs the next question -
How in the world do you pronounce Cloche?

According to Webster's it is \ˈklōsh\ and rhymes with gauche.

Now that we now all of that, how about making one of your own?  I've been wanting a bell jar for ages, but couldn't find one for an affordable price.  

So I made one!

glass cloche, DIY glass cloche, DIY bell jar, Halloween decorations, skull, crow


With the base, I spent less than $6 on it, not including spray paint and the E6000!!! Now that's my kind of price!!!

The vase is approximately 8" high by 5" wide.  The washer and knob were spray painted with glossy black paint and then glued on to the bottom of the jar (which is now the top of your Cloche).  That's all there is to it.

The base is a thrift store saucer glued on to a Dollar Tree candlestick with E6000, then spray painted.

glass cloche, DIY glass cloche, DIY bell jar, Halloween decorations, skull, crow


Just the perfect accent for Halloween with the addition of a .97 skull from
 Wally World, a Dollar Tree crow and a little Spanish moss!

Hmmm..... now we need a larger one and a smaller one!!! The smaller one could be a rose bowl from Dollar Tree and I'm sure I could find a larger vase.  Guess I'll hit the thrift store and see what I can find.

Super cheap and easy! My two favorite words!


Photobucket


We're on the Fence! Won't you take a minute and vote for us?

Sunday, October 6, 2013

Witch Niche - Transformed Art Niche for Halloween

One of my earliest memories of Halloween is dressing up as a witch. To me, the witch is the centerpiece of Halloween, so this year we decided to pay homage to my alter ego by transforming the art niche in our entry way.

Halloween decorations, witch art, Halloween printables, Crafty In Crosby

Leigh and Christine did most of art work for the niche and Leigh and I made the pallet sign.

Witchie Witchie Screamie Screamie Happy Happy Halloweenie, Pallet Art, Cricut Art, Halloween Sign
We whitewashed the boards and cut the letters out with the Cricut. Leigh and I both fell in love with this saying and it was Leigh's idea to make it as a pallet sign.  Thanks to Leigh's Dad for procuring the pallet and cutting it apart for us!!!

Here are some of the pieces that Leigh and Christine made - 

Halloween decorations, witch art, Halloween printables, Crafty In Crosby

Halloween decorations, witch art, Halloween printables, Crafty In Crosby

We also had to have the baddest witch of all for our niche - 

Halloween decorations, witch art, Halloween printables, Crafty In Crosby

Here's the jpeg  - 


I created the Peace, Love, Fast Brooms sign in PicMonkey and used orange glitter glue for the letters.  I also sprinkled orange glitter on top of the words Love and Brooms to mix it up a bit.

Halloween decorations, witch art, Halloween printables, Crafty In Crosby

The girls made the cute little broom too!

Here's the jpeg if you would like to make your own - 


We picked up this really awesome glittered witch at Dollar Tree and decided to make her into a piece of art.  Leigh collaged papers on to an 11 x 14 canvas and we glued her on top.  Super easy and looks rather upscale, if I do say so myself.

Dollar Tree, Halloween decorations, witch art, Halloween printables, Crafty In Crosby

I created these pieces in PicMonkey - 

Halloween decorations, witch art, Halloween printables, Crafty In Crosby

Halloween decorations, witch art, Halloween printables, Crafty In Crosby

Here are the jpegs if you would like to download them to use - 


We printed them out as 4 x 6 prints and glued them on to 5 x 7 wood plaques and dressed them up with a little ribbon.

Halloween decorations, witch art, Halloween printables, Crafty In Crosby


October is all about Halloween for us! What about you? Are you decorating for Halloween?

Witching you all a wonderful week! Evil Witch Laugh Here


Photobucket


We're on the Fence! Won't you take a minute and vote for us?


Related Posts Plugin for WordPress, Blogger...